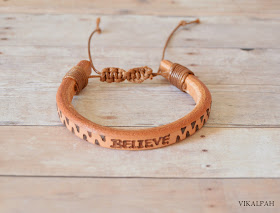
After making the Welcome Sign using Wood burning tool, I was thinking of what else I can do with the wood burning tool.Then I came to know ,It can also be used with leather to burn designs.I experimented with leather bands and was surprised with the results. So, I ended up making these leather bracelets for men. Do you want to make awesome bracelets for you handsome boy friend or if you are guy reading this, do you want to make one for you or your bro? Keep reading to learn how !!
Materials Required :
Leather band - 7 to 8 inches (I got mine at Michael's)
Wood burning tool - Universal nib ,Special nibs(optional)
Waxed cotton cord
E6000
Pen (Optional)
Pliers (Optional)
Step 1: Burn the word on the leather band
First trim your band to fit your wrist if it is too lengthy for your hand. The band which I had was around 8 inches and so I trimmed it to 7 inch to suit my husband's wrist. I decided to write a word(Such as "Hope",Believe","Fearless","Brave","Cool",etc.Whichever suits you or the man you are making) in the middle and decorate with some designs on each side. But If you don't want any words and just design you can very well jump to the next step.
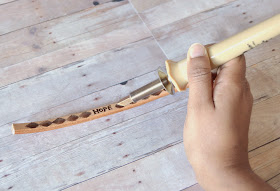
Write the word you want in the middle, in my case it is "Hope". I used a pen to write the word in the center of the band and turned on the burning tool to heat up. Use Universal point for writing letters. Also you can use the trimmed piece for trial to know how the leather reacts with the wood burning tool. What I observed is, you need to be quick when using the tool on the leather . It was so smooth and it felt like I was using a marker pen for writing on the leather. It burns so quickly compared to wood and so plan ahead before starting the project. Once the tool heated up, burn the word using the tool.
Step 2 : Burning the designs
For the design, I used special nib such as a diamond design with stripes and a tear drop shaped nib. But , if you don't have any particular design nib you can always draw the design using pen and burn it with universal nib.
Using pliers remove the universal nib and change it to diamond shaped nib and allowed it to heat up. Once done, make a trial in the trimmed piece(As shown) to know how long you have press and the angle you have to hold the tool to get the whole design ,etc. Plan the design and burn it on the leather band, I just lined up the diamond design on both side of the word which I burned in the previous step.
For the second design, I used the tip of the tear drop nib to create a triangle shaped design on both the sides of the leather band.
Step 3 : Wrapping the ends
- Take 20" length of waxed cotton cord , make a loop at the end of the leather band in such a way that the loop should be formed at the end of the band and the shorter length of the cord is facing towards you(Or towards the other end).Dab a small amount of glue (E6000) for extra security.
- Wrap around the loop using the longer end for eight times. Pass the longer end of the cord into the loop and pull the shorter end of the cord to tighten the loop.Trim the excess at the shorter end and leave the long end of the thread as such.
- Repeat the same on the other end of the leather band.
Step 4 : Making square knot for sliding closure
- Join both the threads from the wrapped ends and lets name it as M (Middle). To make square knot take a thread of length around 15" and make a overhand knot around the M threads. Now you have equal length of threads on the sides of M. Let's name the Left thread as L and the right thread as R.
- Take L and go over the M and under the R.Now take R and go under the M and L in the middle and Over the L as shown and tighten the knot to form the first half of the square knot. Repeat the same step by starting on the R thread first.
- Take R and go over the M and under the L. Now take L and go under the M and R in the middle and Over the R as shown in the picture and tighten the knot to complete the first square knot. Repeat both steps to create a chain of square knot and complete it with a overhand knot. Secure the end with a dab of glue and trim the thread.
- Now make a simple knot at the end of the M threads to prevent the sliding of the threads into the knot and the closure is complete.Voila!! The bracelet is now ready to wear. If you don't want to make the sliding closure by yourself ,get a metal clasp that fits you leather band and glue it at the ends for the closure.
What do you think about this bracelet ?? Will you make one for your man or guy friends or brothers?? What other things have you done with your hands for your husband or any men in your life ?? Share them in the comments below. As always I will be happy to hear from you.


I think they are great for girls too :)
ReplyDeleteI hope you'll find the time to link up with us this week:
http://milaslittlethings.com/2015/04/idea-box-thursday-link-party-5.html
xx
Mila
I love it. Turned out really nice and I think it could be for a woman as well. Thanks for sharing at #HomeMattersParty
ReplyDeleteWow! This looks so nice and such a great tutorial.
ReplyDeleteThank you for Sharing this nice information it is very informatics
ReplyDeleteThe Cobbleroad
Thank you for this share,.
ReplyDeleteIt's very attractive,
http://residorigioielleria.com
Wow, that is beautiful!! I would even wear one of those! #HomeMattersParty
ReplyDeleteWow! what a cool idea!!! #HomeMattersParty
ReplyDeleteWhat a beautiful gift this would make! I agree, these would be great for girls as well! #HomeMattersParty
ReplyDeleteAwesome gift, I love DIY I feel like there is more thought put into it. How long does it take to make? #HomeMattersParty
ReplyDeleteWhat a great craft! It makes a nice bracelet. I can see using these techniques to make a variety of items. Thanks for sharing it! #HomeMattersParty
ReplyDeletethat is very cool! love the braclet, and thanks for sharing with #homemattersparty - also, the pictures you used to illustrate the bracelet and tutorial are so great!! xx, Bee
ReplyDeleteThis looks really neat. I appreciate the tutorial. I like how well you laid it all out for us.
ReplyDeleteVery cool, and great tutorial. Thanks for sharing and co-hosting at the #HomeMattersParty - you're lovely! :)
ReplyDelete~Lorelai
Life With Lorelai
Awesome!
ReplyDeleteAwesome!
ReplyDeleteGreat!
ReplyDeleteThis looks just great!!
ReplyDeleteI must say it's too good,.Perfect style,.
ReplyDeletejewelry online
Thanks for sharing this type of great bracelet styles,
ReplyDeleteit's very nice,.
Limited edition fashion jewelry
Wow,
ReplyDeleteit's just amazing and really nice post,
golf clubs
It's looking just amazing bracelet style.
ReplyDeletefashion jewelry
Thank you for this really an amazing post,
ReplyDeleterose gold jewellery
This comment has been removed by a blog administrator.
ReplyDeleteAre you on the lookout for trusted student visa consultants Amritsar to assist with your Australia study plans? This forum is the perfect place to discover and discuss reliable consultants who specialize in Australia student visas. Share your experiences, feedback, and inquiries related to the services offered by student visa consultants in Amritsar. Let's build a valuable resource for those embarking on their educational journey to Australia.
ReplyDeleteSadaf Technical Cleaning in Dubai is a reputable service provider offering expert air conditioning repair services. Their skilled technicians are committed to providing efficient solutions for a range of AC issues, ensuring optimal performance and customer satisfaction. With a focus on quality service, Sadaf Technical Cleaning is a trusted choice for reliable Ac repair in dubai.
ReplyDeleteStickwerbung ist Ihr führendes Fachgeschäft in Dortmund, wenn es um individuelle Gestaltung und hochwertige Berufsbekleidung geht. Entdecken Sie vielfältige Möglichkeiten, t shirts bedrucken dortmund, um Ihre persönlichen Statements zu unterstreichen. Zudem bietet Stickwerbung eine breite Auswahl an Berufsbekleidung für die Gastronomie, die nicht nur stilvoll, sondern auch funktional ist. Verleihen Sie Ihrem Team eine einheitliche und ansprechende Erscheinung mit der professionellen Berufsbekleidung für die Gastronomie von Stickwerbung. Erfahren Sie, wie Stickwerbung Ihre Bedürfnisse nach Kreativität und Funktionalität vereint.
ReplyDeleteLederarmbänder sind ein stilvolles Accessoire und erfreuen sich großer Beliebtheit. In diesem Artikel erfahren Sie Schritt für Schritt, wie Sie ein Lederarmband selbst herstellen können. Egal, ob Sie es für sich selbst machen oder als Geschenk – ein handgemachtes Armband ist immer etwas Besonderes. Für diejenigen, die in Dortmund nach Berufsbekleidung suchen, gibt es großartige Möglichkeiten, Berufsbekleidung Dortmund und berufsbekleidung medizin in hoher Qualität zu finden. Auch personalisierte Accessoires, wie z.B. eine cap besticken lassen oder ein hakro polo mit logo bestickt, sind eine tolle Ergänzung zu Ihrem Look. Wenn Sie auf der Suche nach einzigartiger Arbeitskleidung sind, können Sie Ihre arbeitskleidung besticken lassen oder sogar Ihren pullover besticken lassen. Selbst mützen besticken lassen zu lassen, ist eine Möglichkeit, Ihre Garderobe individuell zu gestalten.
ReplyDeleteEazy to Net makes it so much easier to find government jobs in Bihar. The site is always updated with the latest job openings and schemes. I check it regularly for updates.
ReplyDeleteMonash University consistently ranks among the top universities globally, known for its world-class education, cutting-edge research, and exceptional facilities. Its strong global reputation makes it an excellent choice for students seeking quality higher education. Explore the latest rankings and learn why Monash stands out as a leader in academia. Check out the detailed ranking information here: Monash University Ranking.
ReplyDeleteThe Radmin Vpn website is incredibly user-friendly! I found everything I needed in seconds, and the installation guide made setup a breeze. This tool is a must-have for smooth and secure virtual connections!
ReplyDelete