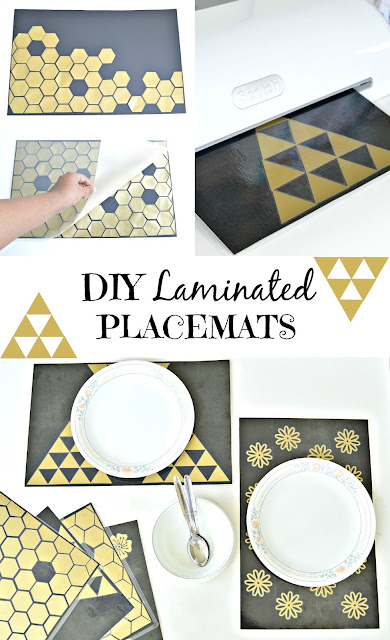
I was looking for placemats wherever I go, I came across a lot of pretty nice ones but they were expensive and at the same time, they were all cloth type placemats which is a lot of maintenance. There were no laminated placemats with pretty patterns or colors, mostly they were with graphics like fruits or some kind of antique pictures.(Atleast in the places where I shopped). I had some large laminate sheets which came with the laminator and I have never used it. They were in the size of placemats.So I thought why not make our own. Here is how I made.
Materials used :
Laminator
Laminate sheets (11.5" X17.5")
Poster board (I used 22" X 28")
Bulletin board paper
Paper glue(I used adhesive roller)
Silhouette electronic cutting machine(Optional)
Scissors
Pencil and ruler
Step 1: Mark 11"X 17" on the poster board using ruler and pencil. Cut them using scissors. You will get three piece per poster board. I used black poster to match my dining table. The black poster board had some white edges which I trimmed using scissors.
Step 2: Cut your designs on bulletin board paper using scissors or any electronic cutting machine. I used copy paper settings to cut designs.
Using another poster board to create patterns on the top of the base was not a good idea as it creates gaps around the patterns after laminating which was not appealing.(Refer the picture below). There was something called bulletin board paper near the poster board section in Hobby lobby which was less in thickness compared to poster board (Refer second picture below)
and also came in 2ft x 4ft roll. So I used that paper to create designs on the top of black poster board.
 |
| Used gold poster board to create designs |
 |
| Used bulletin board paper to create designs |
Step 3: Once you have your designs cut glue them to the poster board using any paper glue. I used adhesive roller to secure the designs. I made them as double sided with geometric patterns on one side and floral designs on the other side.
You can skip this step of cutting patterns/designs from paper and draw your own design using paint pen. I drew the one shown below for you reference. There are just a Zentangle design.
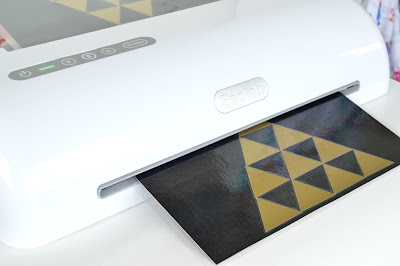
Step 4: Keep them in between the laminate sheet and heat your laminator. Once it is ready, pass them through the rollers.That's it. Your laminated placemat is ready!!
Hope this inspired to make your laminated placemats. These are very easy to use and maintain. And are totally customizable. You can use your own artwork as placemats or your child's artwork as placemats. I also wanted to share couple of things that I wish I had known before, 1)Try to avoid dark colored poster board for laminating project like this. I don't know whether it is visible in the pictures here, but when seen in person there are some spots(Don't know what to called them) which gives uneven black look for the placemats. 2)Avoid using dotted adhesive roller tape because the dots are very lightly visible after laminating. It is very less noticeable but it kind of bothers. So, It is better to use any other paper glue or glue stick which is smooth rather than dotted.
Hope these tips helps you avoid the mistakes I made and allows you to make beautiful placemats for your home. If you make these placemats what designs/patterns you will prefer? Share them in the comments below. As always I will be happy to hear from you.


These are beautiful and so original. I have lots of pretty wrapping paper that I want to turn into placemats. I don't have a laminator but I called Office Max and they only charge $2.99 a sheet.
ReplyDeleteThank you, Sandra!! That is a great idea to use pretty wrapping papers.
DeleteGreat Geometric designs. I think I want to make them with the type of geometric monogram I designed for a different project here -http://3dcuts.com/monogram-box-tutorial. The radial monogram design would look stunning on a laminated placemat. Also, have you ever worked with wood veneers? Your triangles made me think of this project I did with wood veneers in triangles. http://www.ashbeedesign.com/2013/06/upcycle-wine-bottles-add-touch-of-wood.html
ReplyDeleteI haven't worked with wood veneers but that such a great idea. I love your project too.
DeleteLovely idea and lovely designs! I don't like fabric place mats, with kids they are more time in the washer than on the table, so yeah, laminated placemats are great and easy to keep clean!
ReplyDeleteThank you Katrin :)
DeleteOnce again, you're amazing! These are adorable and would be perfect for parties! :) #HomeMattersParty
ReplyDeleteI love your designs on the placemats! What a cute idea and frugal way to make it yourself! #HomeMattersParty
ReplyDeleteThese are nice patterns! I like how simple they are to make, but yet how stylish they are. The gold color is a great choice.
ReplyDeleteThis is a wonderful idea! It is so difficult using cloth placemats even with college age children! Love the laminate! #HomeMattersParty
ReplyDeleteI know what you mean about limited choices with placements - this is a great idea. Thanks for sharing at #HomeMattersParty
ReplyDeleteJulie
LiveFromJuliesHouse.com
These turned out great! I love this idea, thanks for sharing it with us. #HomeMattersParty
ReplyDeleteWhat a fun idea...so creative! Thanks for sharing at #HomeMattersParty
ReplyDelete~Lorelai
Life With Lorelai
Wow this is nothing short of amazing! I love the outcome and how easy you make it seem. Would love if you can link up to http://the-wardrobe-stylist.com/2016/07/11/summer-essentials-to-survive/
ReplyDeleteI wonder if you could use fabric instead of poster board?
ReplyDeleteI think you can use, Linda.
DeleteVery creative. Must give it a try.
ReplyDeleteMy kids would love it if I turned their artwork into laminated placemats. That is a great idea! Thanks for sharing with us at the #HomeMattersParty this week.
ReplyDeleteWhat a fun and easy way to customize your table with placemats. Thanks for sharing at the #HomeMattersParty :)
ReplyDelete~Lorelai
Life With Lorelai
A really good Idea - But are they heat resistant?
ReplyDeleteA really good Idea - But are they heat resistant?
ReplyDelete